xaicronとネタが被ったようだけど気にしない><
livedoorでOperations EngineerやってるkazeburoだYo。最近livedoorからオープンソース化された3億ファイルを管理してるオブジェクトストレージ「STF」でも使ってるMessage QueueのQ4Mのインストール方法を紹介するよ! カジュアルだからインストールだけ!
知ってる人も多いと思うけどQ4Mはkazuhoさんによって開発されたMySQLのストレージエンジンとして実装されてるMessage Queue。livedoorではもちろん、mixiやDeNAをはじめソーシャルゲーム各社でも使われている。
Message Queueの説明や使い方はDIS_COMMENTでテーブルスペースフルの猫神様が書いてるので参考になるね!
Perl Hackers Hub 第10回 ジョブキューで後回し大作戦―TheSchwartz,Qudo,Q4M(1) http://gihyo.jp/dev/serial/01/perl-hackers-hub/001001
このQ4M。MySQLのストレージエンジンとして実装されてるので、インストールにするにはもちろんMySQLが必要だ。しかしどのバージョンでも良い訳ではなく、MySQL
5.1系だけが対応となってる。最新の安定版4.05.5には残念ながら対応してない。5.1を動かしていたとしても既にサービスで動いているMySQLに追加していれるもの勇気がいる。
個人的におすすめなのは「Webアプリケーションにおける Job Queue システムの構成例と Worker を作る際に気をつけること」というエントリでも書いたけど、既存のデータベースとは別に導入する方法。
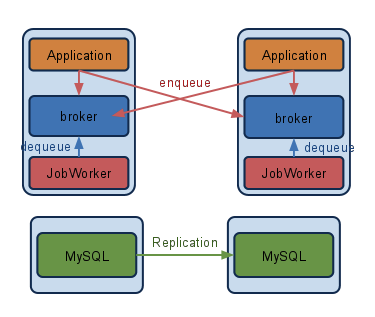
上の図だと、brokerがQ4Mにあたる。
さて、ここまで決まったら、あとは環境をあまりいじらずにQ4Mを入れるだけ。最近うちの会社では(STFでも)次のスクリプトを使ってQ4Mを既存のMySQLとは別に入れてるyo。
#!/bin/sh
set -e

MYVER=5.1.60
Q4MVER=0.9.5

CDIR=$(cd $(dirname $0) && pwd)
cd /usr/local/src

if [ ! -f mysql-$MYVER.tar.gz ]; then
    wget http://downloads.mysql.com/archives/mysql-5.1/mysql-$MYVER.tar.gz
fi

if [ -d mysql-$MYVER ]; then
    rm -rf mysql-$MYVER
fi
tar zxf mysql-$MYVER.tar.gz
cd mysql-$MYVER
# /usr/local/q4m 以下に導入
./configure \
    --prefix=/usr/local/q4m \
    --with-mysqld-ldflags="-static" \
    --with-client-ldflags="-static" \
    --enable-assembler \
    --enable-thread-safe-client \
    --with-charset=utf8 \
    --with-zlib-dir=bundled \
    --with-big-tables \
    --with-mysqld-user=nobody \
    --with-pic \
    --with-extra-charsets=all \
    --with-readline \
    --without-debug \
    --enable-shared \
    --with-fast-mutexes \
    --with-comment="Q4M" \
    --with-server-suffix="-q4m" \
    --with-unix-socket-path="/tmp/mysql_q4m.sock" \
    --with-tcp-port=13306 \
    --with-plugins=none \
    --without-plugin-daemon_example \
    --without-plugin-ftexample \
    --without-plugin-archive \
    --without-plugin-blackhole \
    --without-plugin-example \
    --without-plugin-federated \
    --without-plugin-innobase \
    --without-plugin-innodb_plugin \
    --without-docs \
    --without-man
make
make install

mkdir -p /usr/local/q4m/etc
cp $CDIR/my.cnf /usr/local/q4m/etc
cp $CDIR/q4m.init /etc/init.d/q4m
chmod 755 /etc/init.d/q4m
chkconfig --add q4m

/usr/local/q4m/bin/mysql_install_db --defaults-file=/usr/local/q4m/etc/my.cnf
chmod 755 /usr/local/q4m/var
/etc/init.d/q4m start

cd /usr/local/src
if [ ! -f q4m-$Q4MVER.tar.gz ]; then
    wget http://q4m.kazuhooku.com/dist/q4m-$Q4MVER.tar.gz
fi
if [ -d q4m-$Q4MVER ]; then
    rm -rf q4m-$Q4MVER
fi
tar zxf q4m-$Q4MVER.tar.gz
cd q4m-$Q4MVER
CPPFLAGS="-I/usr/local/q4m/include/mysql" CFLAGS="-L/usr/local/q4m/lib/mysql" ./configure \
    --with-mysql=/usr/local/src/mysql-$MYVER \
    --prefix=/usr/local/q4m
make
mkdir -p /usr/local/q4m/lib/mysql/plugin
cp src/.libs/libqueue_engine.so /usr/local/q4m/lib/mysql/plugin/
cat support-files/install.sql | /usr/local/q4m/bin/mysql -S /tmp/mysql_q4m.sock
my.cnfやinitスクリプトなどソースはすべてgithubで公開中。使う時は
$ git clone git://github.com/kazeburo/mysetup.git
$ cd mysetup/q4m
$ sudo sh ./setup.sh
するだけ!
これをと使うと、 /usr/local/q4m 以下にMySQLとQ4Mを入れて、mysqldのデーモンが起動する。データも
/usr/local/q4m 以下に入る。ポートは 13306
がデフォルトだ。Q4M専用MySQLという位置付けなのでInnoDBは入らないのが注意点。
initスクリプトもインストールするので、
$ sudo /etc/init.d/q4m start|stop|restart
もできる。簡単。
$ /usr/local/q4m/bin/mysql
Welcome to the MySQL monitor.  Commands end with ; or \g.
Your MySQL connection id is 446907
Server version: 5.1.58-q4m-log Q4M

Copyright (c) 2000, 2010, Oracle and/or its affiliates. All rights reserved.
This software comes with ABSOLUTELY NO WARRANTY. This is free software,
    and you are welcome to modify and redistribute it under the GPL v2 license

Type 'help;' or '\h' for help. Type '\c' to clear the current input statement.
ちなみにCentOSだけで確認しています(_ _)。Macの開発環境はxaicronのスクリプトを使えば簡単、サーバのセットアップは今回ば簡単。これでQ4Mを使わない理由はなくなったね!
蛇足。最近rpmつくるの面倒でこんなscript書いて済ましていることが多い。そういうネタの一つでした。githubでそのうちいくつか公開していくかもしれません。以上。