松信さんが作った Replication Booster for MySQL をデータサイズが大きいデータベースに対して使ってみました。
Yoshinori
Matsunobu’s blog: Making slave pre-fetching work better with SSD
github
- yoshinorim/replication-booster-for-mysql
Replication Booster for MySQL をものすごく簡単に説明すると、以下のようになるでしょうか。
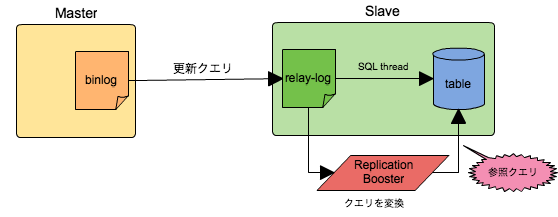
MySQL でレプリケーションを設定した場合、マスターのバイナリログをIOスレッドが読み取り、relay-logへ記録します。そしてSQLスレッドがrelay-logから読み取ってテーブルを更新して行きます。Replication Booster を実行するとrelay-logを読み取り、更新クエリを参照クエリに書き換えてSQLスレッドよりも先にテーブルに対してアクセスします。これにより、InnoDBのbuffer_poolなどメモリ上にこれから更新されるデータを載せ、更新クエリの実行にかかる時間を減らそうというものです。
主なユースケースとしてはスレーブサーバの再起動した際に、バッファをより速く暖めレプリケーションの遅延の解消にかかる時間を短くすることが考えられます。
検証した環境など
今回試したのは再起動後の遅延解消ではなく、メモリに対してデータサイズがとても大きな某サービスのデータベースのバックアップスレーブの遅延対策としてReplication Boosterを動かしてみることです。ちなみにデータサイズは560GB、メモリは16GB(innodb_buffer_pool=10GB)です。毎秒10弱の更新クエリがあります。DiskはSATAをBBU付きRAID1という環境です
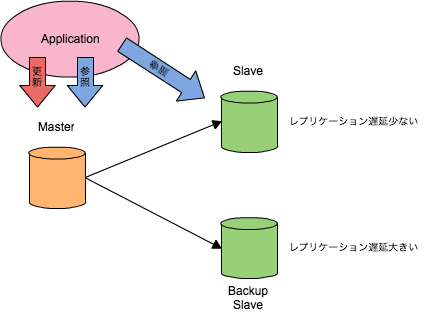
レプリケーション遅延はバックアップスレーブだけではなく参照を行うスレーブサーバでも起きているのですが、参照を行う分だけバッファのヒット率が多少高いのか、バックアップスレーブほど遅延していません。そこでReplication Boosterを使い、バックアップスレーブでも参照クエリを発行してバッファの効率をあげてみるのが今回の狙い。
Replication Booster のインストール
2013年3月時点で、Replication Boosterも依存するBinlog APIもまだpre-alphaということで注意が必要です
今回インストールしたのはCentOS 5.xのサーバ。
まずcmake、bzrのインストールとboostのアップデート。bzrはepelを利用すると簡単。boostは atrpms を利用できます。
$ sudo yum install cmake bzr
$ sudo rpm -Uvh http://dl.atrpms.net/all/boost-1.39.0-9.el5.x86_64.rpm \
  http://dl.atrpms.net/all/boost-devel-1.39.0-9.el5.x86_64.rpm http://dl.atrpms.net/all/boost-wave-1.39.0-9.el5.x86_64.rpm \
  http://dl.atrpms.net/all/boost-thread-1.39.0-9.el5.x86_64.rpm http://dl.atrpms.net/all/boost-test-1.39.0-9.el5.x86_64.rpm \
  http://dl.atrpms.net/all/boost-system-1.39.0-9.el5.x86_64.rpm http://dl.atrpms.net/all/boost-static-1.39.0-9.el5.x86_64.rpm \
  http://dl.atrpms.net/all/boost-signals-1.39.0-9.el5.x86_64.rpm http://dl.atrpms.net/all/boost-serialization-1.39.0-9.el5.x86_64.rpm \
  http://dl.atrpms.net/all/boost-regex-1.39.0-9.el5.x86_64.rpm http://dl.atrpms.net/all/boost-python-1.39.0-9.el5.x86_64.rpm \
  http://dl.atrpms.net/all/boost-program-options-1.39.0-9.el5.x86_64.rpm http://dl.atrpms.net/all/boost-math-1.39.0-9.el5.x86_64.rpm \
  http://dl.atrpms.net/all/boost-iostreams-1.39.0-9.el5.x86_64.rpm http://dl.atrpms.net/all/boost-graph-1.39.0-9.el5.x86_64.rpm \
  http://dl.atrpms.net/all/boost-filesystem-1.39.0-9.el5.x86_64.rpm http://dl.atrpms.net/all/boost-date-time-1.39.0-9.el5.x86_64.rpm \
  http://dl.atrpms.net/all/boost-doc-1.39.0-9.el5.x86_64.rpm
epelのyum repository利用しにくい環境の場合は、
$ sudo yum install python-pycurl
$ sudo rpm -Uvh  http://dl.fedoraproject.org/pub/epel/5/x86_64/bzr-2.1.4-2.el5.x86_64.rpm \
  http://dl.fedoraproject.org/pub/epel/5/x86_64/python-paramiko-1.7.6-1.el5.noarch.rpm \
  http://dl.fedoraproject.org/pub/epel/5/x86_64/python-crypto-2.0.1-4.el5.2.x86_64.rpm
これでも大丈夫です。
次にBinlog APIのインストール。repositoryは https://code.launchpad.net/mysql-replication-listener にあります
$ bzr branch lp:mysql-replication-listener
$ cd mysql-replication-listener/
$ cmake .
$ make -j4
$ sudo make install
最後にreplication_boosterのビルド
$ git clone git://github.com/yoshinorim/replication-booster-for-mysql.git
$ cd replication-booster-for-mysql/
$ cmake .
$ make
検証したサーバではMySQLが通常とは異なるパスに入っていたので、CMakeLists.txtをごにょごにょしました。あと今回は検証目的なので、replication_boosterコマンドはmake installしていません。
コマンドのヘルプ
$ ./replication_booster --help
Usage:
 replication_booster [OPTIONS]

Example:
 replication_booster --user=mysql_select_user --password=mysql_select_pass --admin_user=mysql_root_user --admin_password=mysql_root_password --socket=/tmp/mysql.sock

Options (short name):
 -t, --threads=N                :Number of worker threads. Each worker thread converts binlog events and executes SELECT statements. Default is 10 (threads).
 -o, --offset-events=N          :Number of binlog events that main thread (relay log reader thread) skips initially when reading relay logs. This number should be high when you have faster storage devices such as SSD. Default is 500 (events).
 -s, --seconds-prefetch=N       :Main thread stops reading relay log events when the event's timestamp is --seconds-prefetch seconds ahead of current SQL thread's timestamp. After that the main thread starts reading relay logs from SQL threads's position again. If this value is too high, worker threads will execute many more SELECT statements than necessary. Default value is 3 (seconds).
 -m, --millis-sleep=N           :If --seconds-prefetch condition is met, main thread sleeps --millis-sleep milliseconds before starting reading relay log. Default is 10 milliseconds.
 -u, --user=mysql_user          :MySQL slave user name. This user should have at least SELECT privilege on all application tables (default: root)
 -p, --password=mysql_pwd       :MySQL slave password (default: empty)
 -a, --admin_user=mysql_user    :MySQL administration user for the slave. This user should have at least SUPER and REPLICATION CLIENT (for SHOW SLAVE STATUS) privileges. (default: root)
 -b, --admin_password=mysql_pwd :MySQL password for the administration user. (default:empty)
 -h, --host=mysql_host          :MySQL slave hostname or IP address. This must be local address. (default: localhost)
 -P, --port=mysql_port          :MySQL slave port number (default:3306)
 -S, --socket=mysql_socket      :MySQL socket file path
Replication Booster の実行と結果
replication_boosterは以下のように実行しました
$ ./replication_booster -t 8 -o 10 -u booster -p xxxxxxx -a booster -p xxxxxxx -h 127.0.0.1
スレッドは8個、relay-logはあまりskipせずに頻繁にクエリを実行させてみました。
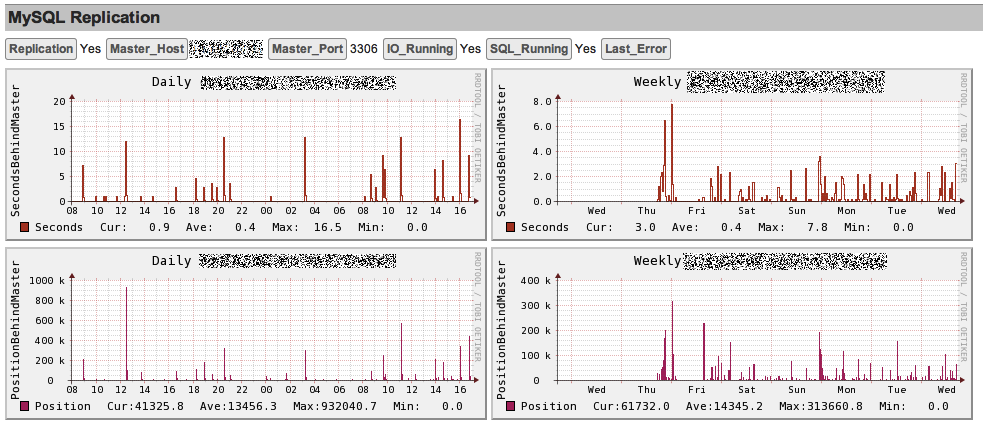
結果は以下
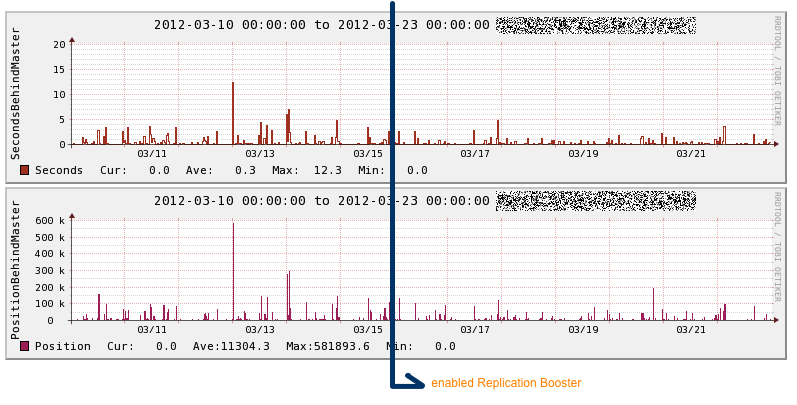
グラフは一つ前のエントリ「CloudForecastでMySQLのレプリケーション監視」によるもの。上が秒数、下がバイナリログのポジション。明らかな差はでてないですが、Seconds Behind Masterの平均を取ると、導入前が「0.5」、実行後は「0.2」と遅延幅は小さくなり、レプリケーション遅延のアラートの回数も減りました。
今後は別のサーバも含めてもうちょっと検証していくつもり